


Introduction to Arduino
Arduino is an open-source platform used for building electronics projects.- consists of both physical programmable circuit board(microcontroller) and a piece of software.
- was introduced back in 2005 in Italy by Massimo Banzi.
- contains microcontroller which is able to be programmed to sense and control objects in the physical world.
- able to interact with a large array of outputs such as LEDs, motors, and displays.
- Arduino Uno is one of the more popular boards in the Arduino family and great choice for beginners due to its low cost and flexibility.
What does Arduino do?
The Arduino hardware and software was designed for artists, designers, hobbyists, hackers, newbies, and anyone interested in creating interactive objects or environments.

- interact with buttons, LEDs, motors, speakers, GPS units, cameras, the internet, and even your smart- phone or your TV.
- For everything from robots and a heating pad hand warming blanket to honest fortune-telling machines, and even a Dungeons and Dragons dice-throwing gauntlet, the Arduino can be used as the brains behind almost any electronics project.
Arduino Uno
One of the most popular Arduino boards out there is the Arduino Uno. While it was not actually the first board to be released, it remains to be the most actively used and most widely documented on the market. Because of its extreme popularity, the Arduino Uno has a ton of project tutorials and forums around the web that can help you get started or out of a jam. We’re big fans of the Uno because of it’s great features and ease of use.

- Reset Button – This will restart any code that is loaded to the Arduino board.
- AREF – Stands for “Analog Reference” and is used to set an external reference voltage.
- Ground Pin – There are a few ground pins on the Arduino and they all work the same.
- Digital Input/Output – Pins 0-13 can be used for digital input or output.
- PWM – The pins marked with the (~) symbol can simulate analog output.
- USB Connection – Used for powering up your Arduino and uploading sketches.
- TX/RX – Transmit and receive data indication LEDs.
- ATmega Microcontroller – This is the brains and is where the programs are stored.
- Power LED Indicator – This LED lights up anytime the board is plugged in a power source.
- Voltage Regulator – This controls the amount of voltage going into the Arduino board.
- DC Power Barrel Jack – This is used for powering your Arduino with a power supply.
- 3.3V Pin – This pin supplies 3.3 volts of power to your projects.
- 5V Pin – This pin supplies 5 volts of power to your projects.
- Ground Pins – There are a few ground pins on the Arduino and they all work the same.
- Analog Pins – These pins can read the signal from an analog sensor and convert it to digital.
How to program on Arduino?
Once the circuit has been created on the breadboard, you’ll need to upload the program (known as a sketch) to the Arduino. The sketch is a set of instructions that tells the board what functions it needs to perform. An Arduino board can only hold and perform one sketch at a time. The software used to create Arduino sketches is called the IDE which stands for Integrated Development Environment. The software is free to download and can be found. https://www.arduino.cc/en/Main/Software

Every Arduino sketch has two main parts to
the program:
void setup() – Sets things up that have to be done once and then don’t
happen again.
Application Area:
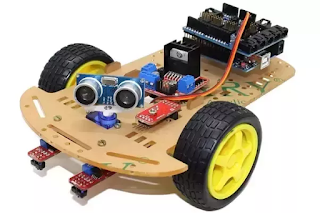
- Robotics and Control Systems:

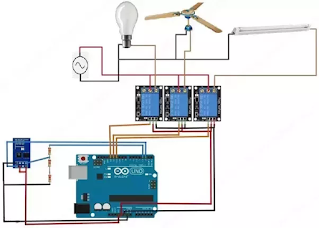
- Home and Industry Automation:

- Hacking:


No comments:
Post a Comment